Sharepoint as a File Store (Using Azure App)
Enablix customers can configure Enablix to store files on a third-party cloud storage platform. Enablix supports Sharepoint to store Enablix files. Once integrated, all your files will be stored on your company's Sharepoint account. Enablix supports two methods to integration with your organization's Sharepoint instance.
- Integration using user account
- Integration using an Azure app (Recommended)
This article discusses integration with Sharepoint using an Azure app. For integrating with Sharepoint using a user account, please refer to this article.
We recommend integrating with Sharepoint using Azure app because,
- The integration is not tied to a user account on Office 365 (O365).
- If your IT team implements O365 multi-factor authentication (MFA) then user-account based integration will not work.
- Azure app integration is more secured and recommended approach by Microsoft.
There are five tasks to accomplish this integration.
- Register an App in Azure Portal
- Generate Password for the Application
- Add Application Permissions
- Identify Sharepoint Site ID
- Configure Sharepoint Integration in Enablix
Register an App in Azure Portal
- 1
- Go to the Azure Portal - https://portal.azure.com. And sign in as an admin to your organization. Please note that you should have admin rights to your Microsoft account for registering an application.
- Expand menu from the top-left drawer icon and click on Azure Active Directory button.
-


- 2
-
On the active directory overview page, select App registrations option from the left side menu.
-


- 3
- On the App registrations page, click on New Registration button in the right hand section.
-


- 4
- Enter the application name as Enablix and click Register button.
-

- 5
- On the application registration page, copy the Application (client) ID value and Directory (tenant) ID. You will need these values when you configure this integration in the Enablix Admin Console.
-

-
Note:
You will need the Application ID and Tenant ID value when configuring the integration in Enablix Admin console.

Generate Password for the Application
Once the application is created and registered successfully, one of the admin users needs to give consent to the permissions required by the application. To give consent, you should be an administrator.
- 1
-
Continuing in the Application Registration screen, click on Certificate & secrets option in the left side menu.


- 2
-
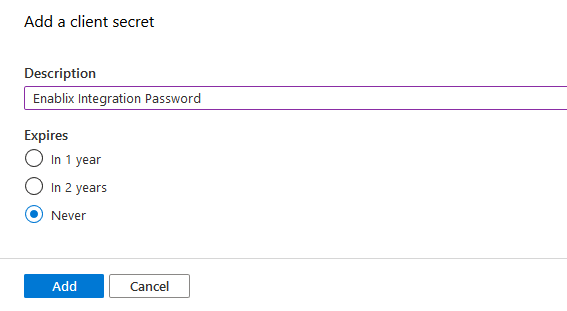
On the Certificates & secrets page, click on New client secret under Client secrets section on the right side.
-


- 3
-
Enter description for the new client secret and select Never option for Expires setting. Click Add button to generate client secret.
- 4
-
Copy the value of the new client secret.
-

-
Note:
You will need this client secret value when configuring the integration in Enablix Admin console.

Add Application Permissions
- 1
-
Continuing in the Application Registration screen, select API Permissions option in the left side menu.
-

- 2
-
On the API Permissions page, click on Add a permission button.
-

- 3
-
On Request API permissions page, select Microsoft Graph under Microsoft APIs tab. The application registration is complete.
-

- 4
-
Click on the Application permissions on the Microsoft Graph page.
-

- 5
-
Type File in the Select permissions field and select Files.ReadWrite.All. Click Add permissions to add selected permission.
-
- 6
- Click Grant admin consent for Enablix button to provide consent for provided permissions.
-

- 7
-
Accept the requested permissions. It is possible that you may see a dialog prompt asking you to accept the requested permissions.

Otherwise, you will see the status updated for both the permissions as shown in the screenshot below.

- 1
- To fine the hostname go to https://portal.azure.com and select Azure Active Directory in the left bar. On the right hand side you will see the URL <host id>.onmicrosoft.com. You should use that host id to derive the hostname. The hostname will be <host id>.sharepoint.com.
-

- 2
- spsite-id is the site ID. Follow these steps to retrieve the site ID.
- Go to the site in Sharepoint.
- The URL address in the address bar should follow this format - https:// name>.sharepoint.com/sites/<site name>. E.g. https://enablix.sharepoint.com/sites/marketing
- Append the following text - /_api/site/id to the end of this URL in the address and click enter. E.g. https://enablix.sharepoint.com/sites/marketing/_api/site/id
- The browser will load an XML structure. Copy the value in the ID node. Please refer to the screenshot below.

- 3
- spweb-id is the site collection ID. Follow these steps to retrieve the site collection ID.
- The URL address in the address bar should follow this format - https:// name>.sharepoint.com/sites/<site name>. E.g. https://enablix.sharepoint.com/sites/marketing
- Append the following text - /_api/web/id to the end of this URL in the address and click enter. E.g. https://enablix.sharepoint.com/sites/marketing/_api/web/id
- The browser will load an XML structure. Copy the value in the ID node. Please refer to the screenshot below.

- 1
-
Go to the Integrations tab in Company Settings. By default, the File Storage is configured to store files on Enablix servers. Mouse over the existing configuration, click Edit, and select Sharepoint Using Azure App as the file store

- 2
-
You will see a form appear. Please fill the form as follows.
- Microsoft Organization Id: This is the Tenant ID (also known as Directory ID) that you had copied in an earlier step when registering the application in the Azure.
- Application ID: This is the application ID that you had copied in the an earlier step when registering the application
- Application Password: This is the client secret value that you had copied in an earlier step during application registration.
- Sharepoint Site Id: Sharepoint site id is of the format: <hostname>,<spsite-id>,<spweb-id>. You should have these values from the Identify Sharepoint Site ID step. Here is an example of a sample site id: enablix.sharepoint.com,40b30b7f-96c6-7eab-ad66-52e1f3615e4b,9e40c171-3c34-4d9e-bd70-97902fc0260f . If you intend to store the Enablix content on your organization's default Sharepoint Site, then the Sharepoint Site ID is root.
- Base Folder: Enter a folder name where all your Enablix files will be stored. If the folder with the given name does not exist, Enablix will create one.

- 3
- Save the changes


Identify Sharepoint Site ID
This step is required if you want to store the Enablix content to a specific Sharepoint site. If you want to store the content to the organization's default Sharepoint Site, then the Sharepoint Site ID is root. For other sites, please follow these instructions.
Sharepoint site id is of the format: <hostname>,<spsite-id>,<spweb-id>
Follow these steps to identify these values to construct the Sharepoint Site ID. Once identified, copy these three values as they will be needed during future configuration steps.


Configure Sharepoint Integration In Enablix


-
Enablix is now configured to store files on your organization's Sharepoint account.